General

Making MCP Tool Calls Smarter: A Practical Fine-Tuning Blueprint

Jul 16, 2025

Starting and Growing a Career in Web Design

If you’ve ever worked with multi-tool LLM systems especially within enterprise or DevOps workflows you’ve probably hit a wall with prompt engineering. The more tools you plug into your LLM, the messier the prompts get. Once you go past 10–20 tools, the token count balloons, the responses get less precise, and managing context becomes a nightmare.

That’s exactly what led me down the path of fine-tuning a custom model for MCP tool calls.

In this article, I’ll Walk you through a practical, hands-on guide to fine-tuning an LLM that makes smarter, cleaner, and more efficient tool calls. No fluff, no excessive theory just a clear blueprint, code included.

My goal? To help others avoid the pain I went through: bloated prompts, over-complicated tool selection, and unpredictable model behavior.

Along the way, I’ll share:

  • Why I chose fine-tuning over traditional prompt engineering

  • How I built and balanced a compact, high-quality dataset

  • What pitfalls I hit during training (hint: overfitting is real!)

  • And the exact steps I used to train and deploy a functional model

I’ve open-sourced everything — the dataset (yashsoni78/conversation_data_mcp_100) and the model (yashsoni78/mcp_tool_model) from hugging face, so you can plug it into your own workflows or extend it as needed.

This is a practical blueprint designed for engineers, ML enthusiasts, and builders who are tired of tweaking prompts and want a scalable, token-efficient solution for tool use.

Section 2: What We’re Working With

Before diving into the code, let’s understand what exactly we’re fine-tuning and why the structure of the dataset plays such a critical role in making MCP tool calls smarter.

The Goal

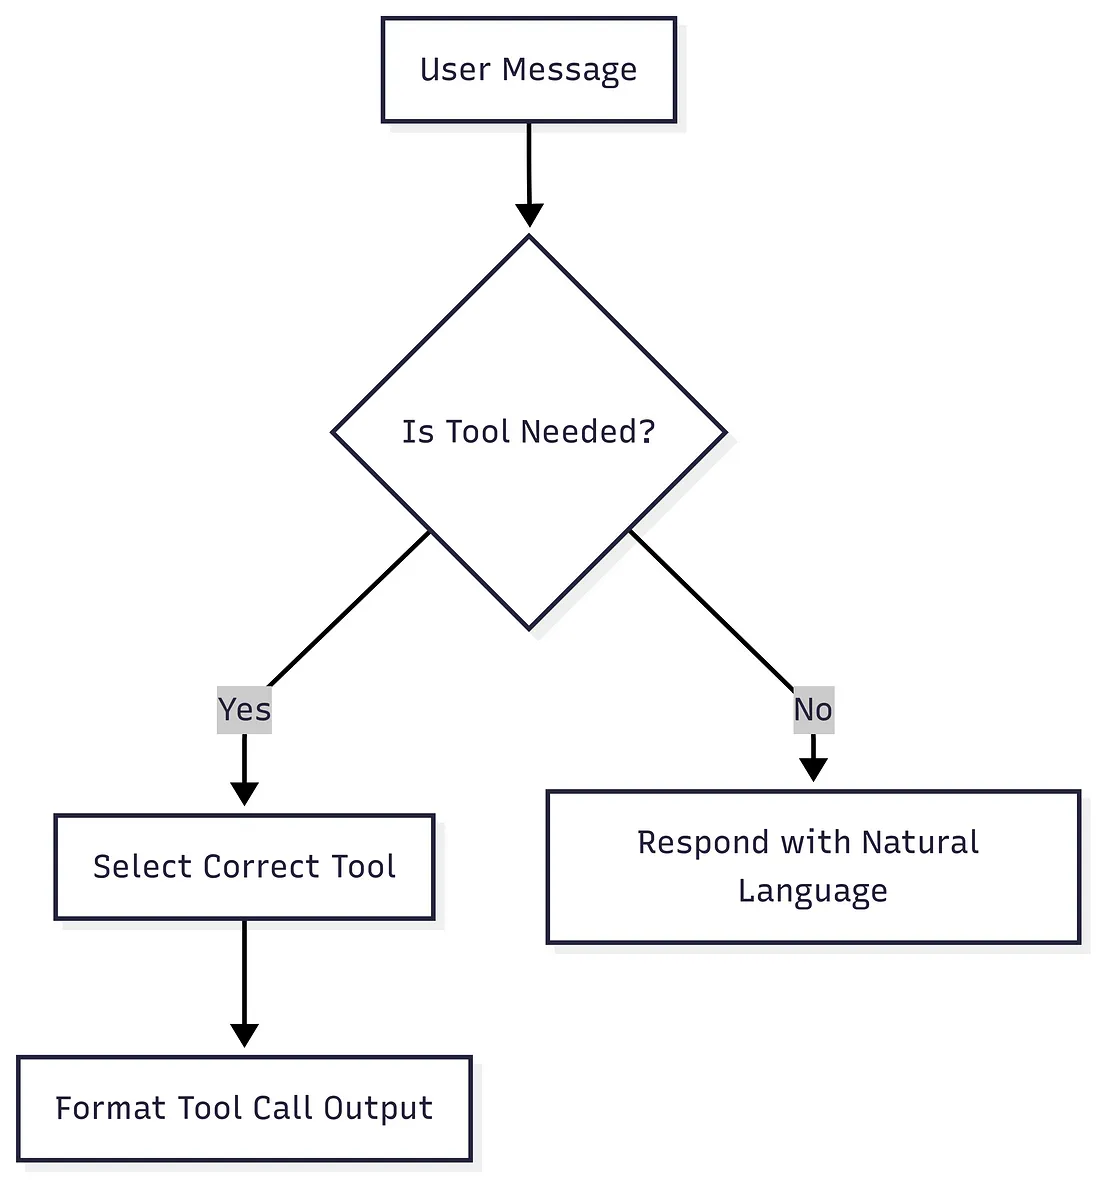
The objective is to build an LLM that can:

  • Decide when to trigger a tool call

  • Select the correct tool from a set of predefined options

  • Handle conversational queries that don’t require tool calls gracefully

This eliminates the need to embed entire tool descriptions in prompts, making requests faster, cheaper, and more scalable.

Dataset Strategy: Quality > Quantity

Instead of training on a massive, noisy dataset, I chose a balanced and handcrafted dataset of just 100 examples:

Dataset Breakdown

| Example Type | Tool Name | Count |
| ------------------- | ----------------------- | ------- |
| Tool Call Example | get_vm_status | 20 |
| Tool Call Example | list_storage_buckets | 15 |
| Tool Call Example | create_support_ticket | 25 |
| Conversational Only | (No tool triggered) | 40 |
| Total | — | 100 |

This dataset is available here:

yashsoni78/conversation_data_mcp_100 · Datasets at Hugging Face

Lessons from Dataset Preparation

Before finalizing the dataset, I experimented with larger sources like:

  • alihmaou/Agents_MCP_Hackathon_Tools_List (too broad and inconsistent)

  • Custom 1500-example tool call set (overfitted, hallucinated outputs)

Ultimately, I learned that a smaller, well-balanced dataset outperforms a larger, noisy one. It makes the model:

  • More stable

  • Less likely to hallucinate

  • Better at generalizing across similar tool patterns

Section 3: The Fine-Tuning Blueprint (Step-by-Step)

Let’s walk through the full process of fine-tuning your model — from preparing the data to training and evaluating the final version. I’ve broken it down into clear steps so you can follow along and adapt it for your own tool-call workflows.

The first step is to load the dataset from Hugging Face and clean it for training.

Step 1: Load and Pre-process the Dataset


from datasets import load_dataset

DATASET_REPO_ID = "yashsoni78/conversation_data_mcp_100"

try:
    # This single command downloads and loads the dataset into memory
    dataset = load_dataset(DATASET_REPO_ID, split="train")
    logging.info(f"✅ Successfully loaded dataset from Hugging Face Hub: {DATASET_REPO_ID}")
except Exception as e:
    logging.error(f"❌ Failed to load dataset from Hugging Face. Please check the repository ID and your connection. Error: {e}")
    exit()

Always inspect your dataset structure early. It prevents hidden issues during tokenization and model training.

Step 2: Data Cleaning & Formatting

You’ll need to ensure the data is in a structured prompt response format that’s ideal for LLM fine-tuning.

def format_for_chat_template(example):
    """
    Converts the 'conversations' list into the 'messages' format
    that the SFTTrainer expects for chat templates.
    """
    messages = []
    # The first turn is always the system prompt
    if example['conversations'][0]['from'] == 'system':
        messages.append({"role": "system", "content": example['conversations'][0]['value']})
        turns = example['conversations'][1:]
    else:
        turns = example['conversations']

    # Process the rest of the turns
    for turn in turns:
        role = "user" if turn['from'] == 'human' else "assistant"
        messages.append({"role": role, "content": turn['value']})
        
    return {"messages": messages}

# Use the .map() method for efficient processing
chat_dataset = dataset.map(format_for_chat_template)
# Remove the old columns to keep the dataset clean
chat_dataset = chat_dataset.remove_columns(dataset.column_names)

logging.info("✅ Dataset formatted successfully for the trainer.")
print("\n--- Example of one entry in the new format ---")
print(chat_dataset[0]['messages'])
Step 3: Tokenize the Dataset


# Model and tokenizer names
model_name = "mistralai/Mistral-7B-Instruct-v0.2"

# Quantization configuration
bnb_config = BitsAndBytesConfig(
    load_in_4bit=True,
    bnb_4bit_quant_type="nf4",
    bnb_4bit_compute_dtype=torch.bfloat16,
    bnb_4bit_use_double_quant=False,
)
logging.info("BitsAndBytesConfig created.")

# Load model
try:
    model = AutoModelForCausalLM.from_pretrained(
        model_name,
        quantization_config=bnb_config,
        torch_dtype=torch.bfloat16,
        device_map="auto",
        trust_remote_code=True,
    )
    model.config.use_cache = False
    model.config.pretraining_tp = 1
    logging.info("Model loaded successfully.")
except Exception as e:
    logging.error(f"Error loading model: {e}")
    exit()

# Load tokenizer
try:
    tokenizer = AutoTokenizer.from_pretrained(model_name, trust_remote_code=True)
    tokenizer.pad_token = tokenizer.eos_token
    tokenizer.padding_side = "right"
    logging.info("Tokenizer loaded successfully.")
except Exception as e:
    logging.error(f"Error loading tokenizer: {e}")
    exit()
Step 4: Initialize PEFT (LoRA) Configuration and Fine-Tune the Model


# PEFT configuration
peft_config = LoraConfig(
    lora_alpha=16,
    lora_dropout=0.1,
    r=64,
    bias="none",
    task_type="CAUSAL_LM",
)
logging.info("LoRA config created.")

# Prepare model for training
model = prepare_model_for_kbit_training(model)
model = get_peft_model(model, peft_config)
logging.info("Model prepared for k-bit training with PEFT.")

# Define the directory for TensorBoard logs
tensorboard_log_dir = "./logs"

# Training arguments
training_arguments = TrainingArguments(
    output_dir="./results",          # Directory to save model checkpoints and logs
    num_train_epochs=10,             # Total number of training epochs
    per_device_train_batch_size=2,   # Batch size per device (GPU/CPU) during training
    gradient_accumulation_steps=1,   # Number of steps to accumulate gradients before updating weights
    optim="paged_adamw_32bit",       # Optimizer type; here, a memory-efficient 32-bit AdamW variant
    save_steps=50,                   # Save checkpoint every 50 steps
    logging_steps=10,                # Log training metrics every 10 steps
    logging_strategy="steps",        # Logging strategy: log every few steps
    logging_dir=tensorboard_log_dir, # Directory for TensorBoard logs
    learning_rate=2e-4,              # Learning rate for optimizer
    weight_decay=0.001,              # Weight decay (L2 regularization) to avoid overfitting
    fp16=False,                      # Use 16-bit floating point precision (disabled)
    bf16=True,                       # Use bfloat16 precision (enabled), useful on hardware that supports it
    max_grad_norm=0.3,               # Maximum gradient norm for gradient clipping (prevents exploding gradients)
    max_steps=-1,                    # Total number of training steps (-1 means use all steps from `num_train_epochs`)
    warmup_ratio=0.03,               # Fraction of total steps used for learning rate warmup
    group_by_length=True,            # Group sequences of similar lengths to speed up training and reduce padding
    lr_scheduler_type="constant",    # Learning rate scheduler type (constant: no decay)
)

# Initialize the SFTTrainer
trainer = SFTTrainer(
    model=model,                # The model to be fine-tuned
    train_dataset=chat_dataset, # Dataset used for training
    peft_config=peft_config,    # Parameter-efficient fine-tuning (PEFT) configuration
    args=training_arguments,    # Training arguments defined above
)

# Start fine tuning
trainer.train()


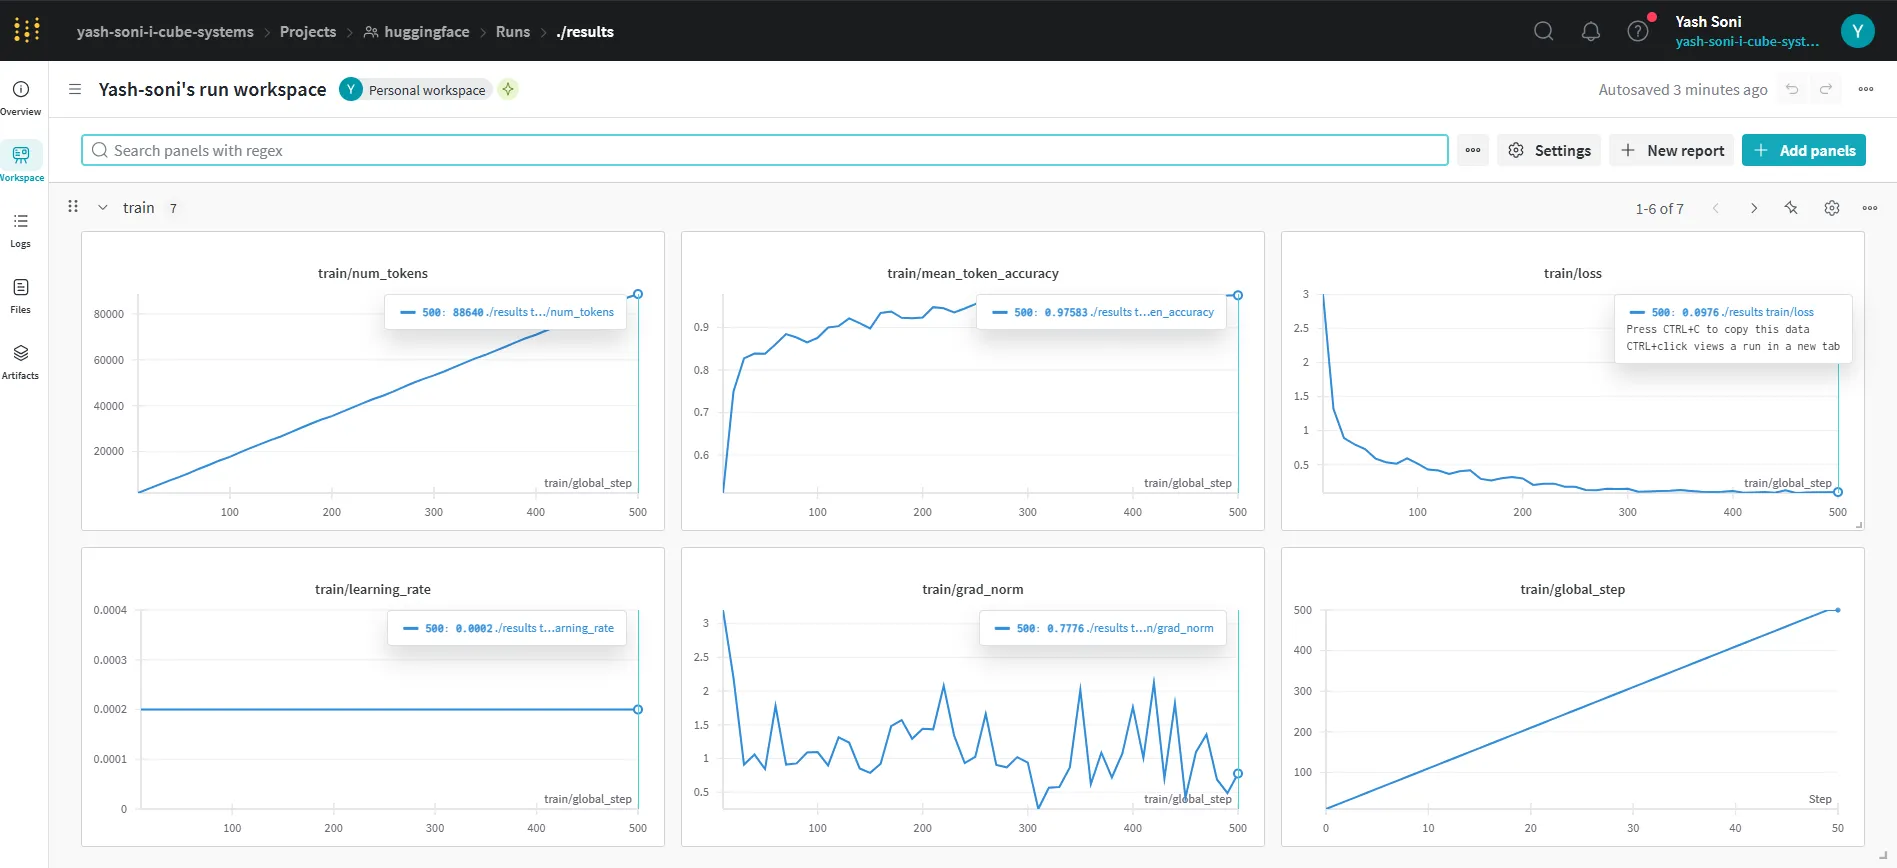
Training logs showing loss drop, token usage, and a consistent rise in token-level accuracy (up to 97.5%). Trained for 500 steps on a 100-example custom dataset.

As you can see above, the training stabilized nicely without spiking gradients or overfitting signs a good indication that the small dataset was well-balanced.

Step 5: Save and Share Your Model

Once the training completes, you can push it to Hugging Face:

model.push_to_hub("yashsoni78/mcp_tool_model")
tokenizer.push_to_hub("yashsoni78/mcp_tool_model")


Section 4: Evaluation, Insights & What Worked

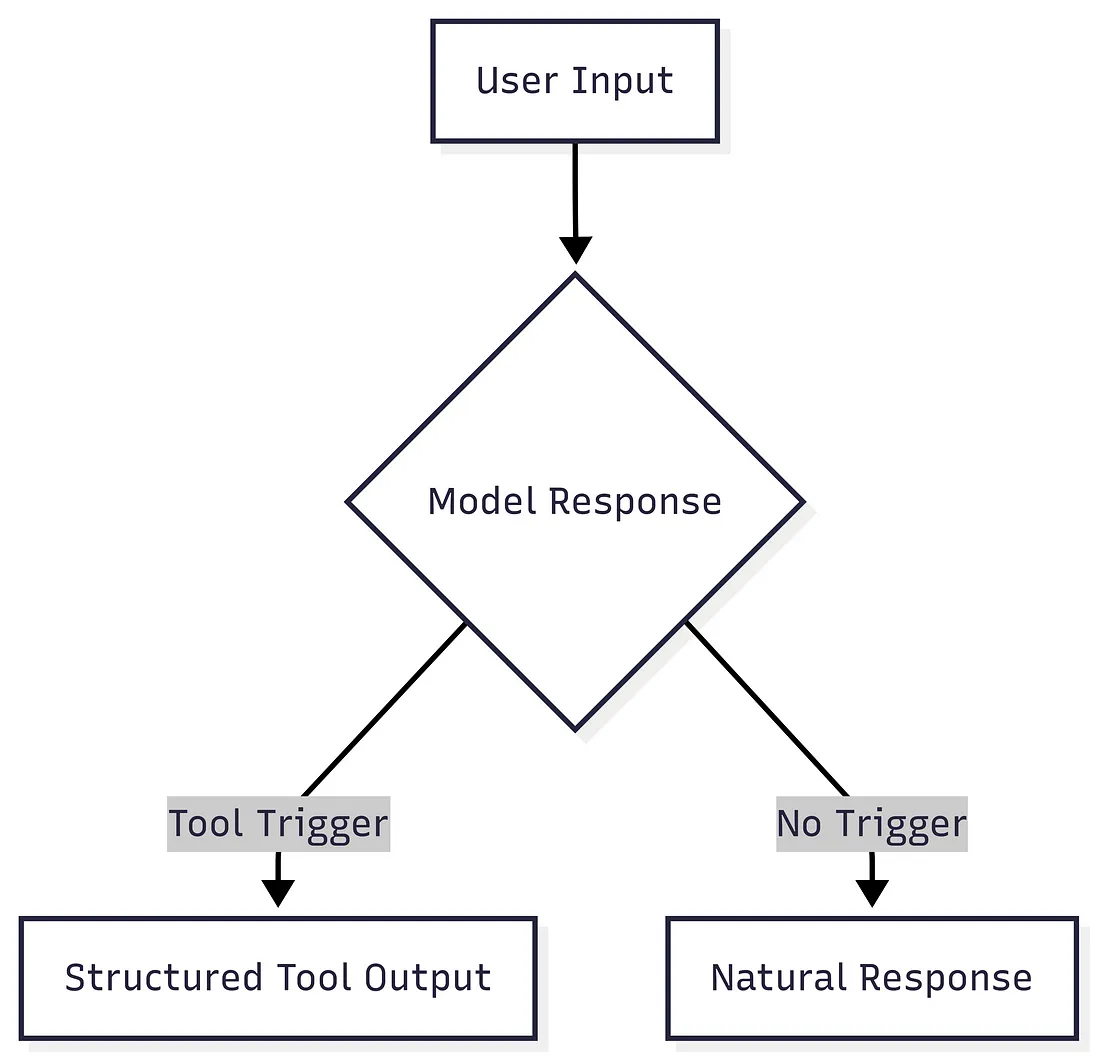
Now that we’ve fine-tuned the model, it’s time to evaluate how it performs on real conversations — especially across both tool-call triggers and natural chat responses. This section focuses on practical insights rather than formal metrics.

1. Manual Testing = Immediate Feedback
from transformers import pipeline

pipe = pipeline("text-generation", model="yashsoni78/mcp_tool_model", tokenizer="yashsoni78/mcp_tool_model")

response = pipe("User: Can you check the status of my VM?")[0]["generated_text"]
print(response)

What to Look For:

  • Does it choose the correct tool?

  • Does it not hallucinate when no tool is needed?

  • Is the output formatted correctly?

2. Example Outputs

Let’s look at a couple of real generations:

Tool Trigger Example:

Input:
User: Can you check the status of my VM?

Output:

{
  "tool_name": "get_vm_status",
  "parameters": {
    "vm_id": "vm-12345"
  }
}

Conversational Example:

Input:
User: What’s the best way to reduce cloud costs?
Output:
There are several strategies including optimizing VM usage, auto-scaling, and using spot instances. Would you like me to generate a report?

This confirms that the model is making intelligent decisions about whether to use a tool or not — which was the original goal.

3. What Didn’t Work (And why)

Like any real-world project, this wasn’t a straight line. Here’s what went wrong along the way:

  • Overfitting on 1500+ tool-only examples:
    The model became too tool-focused and started hallucinating tool calls even in casual chats. Lesson learned: balanced data matters more than size.

  • Using messy public datasets without clean-up:
    Initial attempts using alihmaou/Agents_MCP_Hackathon_Tools_List introduced inconsistent formatting and mismatched tool logic. Custom curation made all the difference.

  • Too many tools = Too many tokens:
    Packing all tools into a prompt broke token limit fast. Fine-tuning removed that bottleneck completely.

Final Thoughts

This fine-tuning effort turned a prompt-bloated, token-hungry LLM into a focused, efficient tool-calling engine.

Thanks to:

  • A carefully curated dataset

  • A well-balanced mix of positive and negative examples

  • Hands-on trial and error

…the model now understands how to act only when needed, reducing cost, improving latency, and scaling tool interactions gracefully.

Bonus: Try It Yourself

yashsoni78/conversation_data_mcp_100 · Datasets at Hugging Face

yashsoni78/mcp_tool_model · Hugging Face

We engineer reliable, scalable, and intelligent digital systems that help businesses modernize, automate, and grow

A40, ITHUM Towers, B-308,

Sector 62 Noida-201301

+91 8750701919

I Cube Systems • All Rights Reserved 2025

We engineer reliable, scalable, and intelligent digital systems that help businesses modernize, automate, and grow

A40, ITHUM Towers, B-308,

Sector 62 Noida-201301

+91 8750701919

I Cube Systems • All Rights Reserved 2025

We engineer reliable, scalable, and intelligent digital systems that help businesses modernize, automate, and grow

A40, ITHUM Towers, B-308,

Sector 62 Noida-201301

+91 8750701919

I Cube Systems • All Rights Reserved 2025